Meskipun TextBlock tidak mewarisi class Control, tapi penggunaannya seperti-mirip control. Kaprikornus simple nya kita sebut control aja ya.
TextBlock ialah salah satu control paling fundamental dalam WPF yang sangat berguna. Seperti label dengan TextBlock kita bisa menuliskan teks di layar dengan cara yang lebih sederhana. Jika pada label kita cuma mampu menampilkan teks satu baris (tetapi mampu memuat gambar), sementara TextBlock walau cuma menampung teks (string) saja tami mampu memperlihatkan dalam beberapa baris (multiline). Keduanya memiliki keunggulan masing-masing tinggal penggunaannya disesuaikan dengan keperluan.
Kita memang sudah pernah coba menggunakannya di aplikasi "Hello World!", namun ayo kita coba lagi mulai dari yang paling sederhana.
<Window x:Class="HelloWPF.Window1"
xmlns="http://schemas.microsoft.com/winfx/2006/xaml/presentation"
xmlns:x="http://schemas.microsoft.com/winfx/2006/xaml"
xmlns:d="http://schemas.microsoft.com/expression/blend/2008"
xmlns:mc="http://schemas.openxmlformats.org/markup-compatibility/2006"
xmlns:local="clr-namespace:HelloWPF"
mc:Ignorable="d"
Title="Window1" Height="150" Width="500">
<Grid>
<TextBlock>Teks ini memakai TextBlockTextBlock>
Grid>
Window>
Hasilnya:

Menambahkan Margin
<Window x:Class="HelloWPF.Window1"
xmlns="http://schemas.microsoft.com/winfx/2006/xaml/presentation"
xmlns:x="http://schemas.microsoft.com/winfx/2006/xaml"
xmlns:d="http://schemas.microsoft.com/expression/blend/2008"
xmlns:mc="http://schemas.openxmlformats.org/markup-compatibility/2006"
xmlns:local="clr-namespace:HelloWPF"
mc:Ignorable="d"
Title="Window1" Height="150" Width="500">
<Grid>
<TextBlock Margin="10">Teks ini memakai TextBlockTextBlock>
Grid>
Window>
Hasilnya:

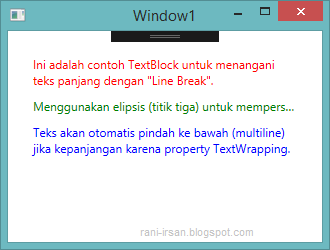
TextBlock dengan Teks yang Panjang
Kemudian kita akan menyaksikan beberapa cara TextBlock menanggulangi teks yang panjang.
<Window x:Class="HelloWPF.Window1"
xmlns="http://schemas.microsoft.com/winfx/2006/xaml/presentation"
xmlns:x="http://schemas.microsoft.com/winfx/2006/xaml"
xmlns:d="http://schemas.microsoft.com/expression/blend/2008"
xmlns:mc="http://schemas.openxmlformats.org/markup-compatibility/2006"
xmlns:local="clr-namespace:HelloWPF"
mc:Ignorable="d"
Title="Window1" Height="150" Width="500">
<Grid>
<StackPanel Margin="20">
<TextBlock Margin="5" Foreground="Red">
Ini yakni pola TextBlock untuk mengatasi<LineBreak />
teks panjang dengan "Line Break".
TextBlock>
<TextBlock Margin="5" TextTrimming="CharacterEllipsis" Foreground="Green">
Menggunakan elipsis (titik tiga) untuk mempersingkat teks yang kepanjangan.
TextBlock>
<TextBlock Margin="5" TextWrapping="Wrap" Foreground="Blue">
Teks akan otomatis pindah ke bawah (multiline) jika kepanjangan karena property
TextWrapping.
TextBlock>
StackPanel>
Grid>
Window>
Hasilnya:
Bold, Italic dan Underline
Formating cetak tebal, miring, dan garis bawah langsung di baris teks.
<Window x:Class="HelloWPF.Window1"
xmlns="http://schemas.microsoft.com/winfx/2006/xaml/presentation"
xmlns:x="http://schemas.microsoft.com/winfx/2006/xaml"
xmlns:d="http://schemas.microsoft.com/expression/blend/2008"
xmlns:mc="http://schemas.openxmlformats.org/markup-compatibility/2006"
xmlns:local="clr-namespace:HelloWPF"
mc:Ignorable="d"
Title="Window1" Height="150" Width="500">
<Grid>
<TextBlock Margin="20" TextWrapping="Wrap">
TextBlock dengan format teks <Bold>Cetak TebalBold>, <Italic>Cetak MiringItalic>
dan <Underline>Garis BawahUnderline> yang diformat langsung dalam
baris teks bersangkutan.
TextBlock>
Grid>
Window>
Hasilnya:

Span
Seperti aku bilang sebelumnya, ini berasa mirip HTML. Dalam TextBlock kita dapat menyisipkan span untuk kerperluan tampilan seperti font-size, style, weight, warna background, warna foreground, dll. Selain itu di dalam span kita tetap mampu menyisipkan unsur inline. Untuk lebih jelasnya mari kita lihat acuan di bawah.
xmlns="http://schemas.microsoft.com/winfx/2006/xaml/presentation"
xmlns:x="http://schemas.microsoft.com/winfx/2006/xaml"
xmlns:d="http://schemas.microsoft.com/expression/blend/2008"
xmlns:mc="http://schemas.openxmlformats.org/markup-compatibility/2006"
xmlns:local="clr-namespace:HelloWPF"
mc:Ignorable="d"
Title="Window1" Height="150" Width="500">
<Grid>
<TextBlock Margin="15" TextWrapping="Wrap">
Ini <Span FontWeight="Bold">merupakanSpan> suatu
<Span Background="Silver" Foreground="Maroon">TextBlockSpan>
dengan <Span TextDecorations="Underline">beberapa
<Span FontStyle="Italic">komponen span,
<Span Foreground="Blue">
memakai <Bold>beberapaBold> macam <Italic>styleItalic>
.
Grid>
Window>
Hasilnya:

Format TextBlock dengan C# dari Code-Behind (Kode belakang)
Untuk melihat cara kerjanya kita bersihkan dulu code XAML menjadi seperti berikut:
<Window x:Class="HelloWPF.Window1"
xmlns="http://schemas.microsoft.com/winfx/2006/xaml/presentation"
xmlns:x="http://schemas.microsoft.com/winfx/2006/xaml"
xmlns:d="http://schemas.microsoft.com/expression/blend/2008"
xmlns:mc="http://schemas.openxmlformats.org/markup-compatibility/2006"
xmlns:local="clr-namespace:HelloWPF"
mc:Ignorable="d"
Title="Window1" Height="150" Width="500">
<Grid>
Grid>
Window>
Kemudian kita ubah kode di belakang nya pada Window1.xaml.cs menjadi sebagai berikut:
using System;
using System.Collections.Generic;
using System.Linq;
using System.Text;
using System.Threading.Tasks;
using System.Windows;
using System.Windows.Controls;
using System.Windows.Data;
using System.Windows.Documents;
using System.Windows.Input;
using System.Windows.Media;
using System.Windows.Media.Imaging;
using System.Windows.Shapes;
namespace HelloWPF
///
/// Interaction logic for Window1.xaml
///
public partial class Window1 : Window
public Window1()
InitializeComponent();
TextBlock tb = new TextBlock();
tb.TextWrapping = TextWrapping.Wrap;
tb.Margin = new Thickness(15);
tb.Inlines.Add("Sebuah contoh ");
tb.Inlines.Add(new Run("kendali TextBlock ") FontWeight = FontWeights.Bold );
tb.Inlines.Add("menggunakan ");
tb.Inlines.Add(new Run("format teks ") FontStyle = FontStyles.Italic );
tb.Inlines.Add(new Run("inline ") Foreground = Brushes.Blue );
tb.Inlines.Add("dengan C# ");
tb.Inlines.Add(new Run("dari aba-aba belakang")
TextDecorations = TextDecorations.Underline );
tb.Inlines.Add(".");
this.Content = tb;

Sumber http://rani-irsan.blogspot.com
Tuesday, July 14, 2020
Wpf C#: Textblock Control
Subscribe to:
Post Comments (Atom)
EmoticonEmoticon